9.7  Weapon Systems

9.7.1  Jettisoning Ordnance and Weapons in Manual Bombing Mode

In an emergency, the "Emergency Jettison Button" above the landing gear lever (panel #2 on the diagram) can be pushed to jettison all ordance from the aircraft.

Normally, (not sure if this is correct) the bomb mode switch is set to MAN, the ordnance to drop is selected on the Armament Panel by pushing the green-lit buttons, and the bomb release button on the stick is pressed.

The wing pylons may also be jettisoned using the guarded Pylon Jettison switch near the rear of the left side panel (not shown on diagram).

Manual Mode:
1. DCU-9/A - set selector to "Air" if BDU-8/B bomb is selected or leave off if using practice bomb dispenser or when jettisoning fuel tanks.
2. Set bomb mode switch from "OFF" to "MAN" on Armament Panel.
3. Select green-lit ordnance light on armament panel for the weapon to release.   On the MN1A, this opens the dispenser doors.
4. Push bomb release button to drop bombs.


9.7.2  Bombing Using Dual-Timer Bombing Mode

This mode is used for precision visual pop-up attacks and level visual low-level attacks and blind low/mid level attacks in conjunction with the radar.  Two types of weapons can be carried on the aircraft, BDU-8/B practice nuclear weapon.  This has a drogue chute that will deploy shortly after release from the aircraft.  The other weapon is the practice bomb of which six are carried in the MN1A practice bomb dispenser.  These have the same ballistic characteristics as the BDU-8/B so the same bomb charts can be used for calculating the run-in and release timer values.

9.7.2.1  Weapon System Setup
  1. Dual Timers - set values as calculated by the Bombing Calculator (see section 9.7.2.4).
  2. DCU-9/A - set selector to "Air" if BDU-8/B bomb is selected or leave off if using practice bomb dispenser.
  3. Bomb Mode - set to "DUAL TIMER" on Armament Panel. 
  4. Ordnance Selector Light - select green-lit ordnance light on armament panel for the weapon to release.   On the MN1A, this opens the dispenser doors.

9.7.2.2  Visual Pop-Up Attack


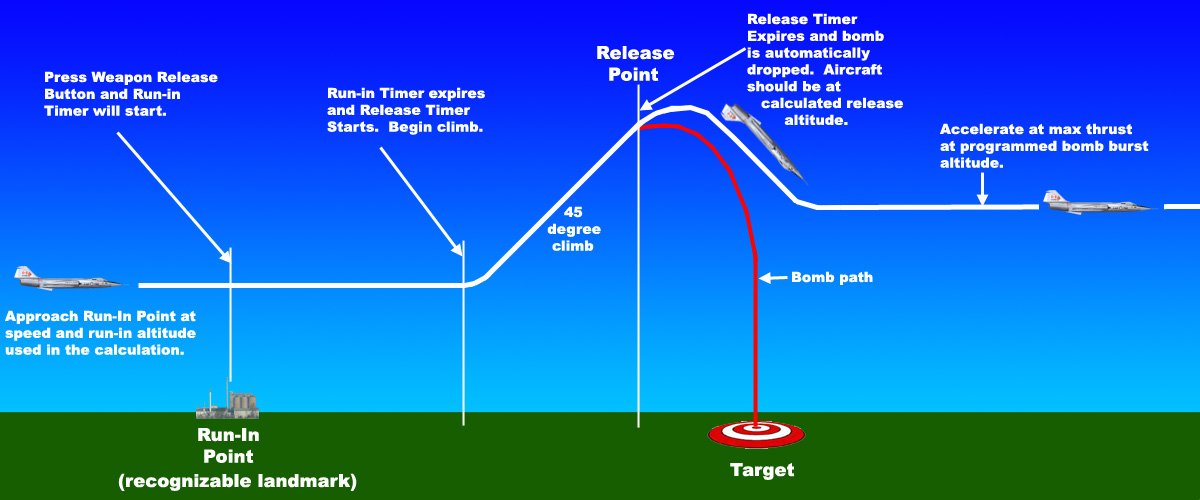
  1. Push bomb release button when over Run-In Point.  The run-in timer will start accompanied by a buzzer tone.
  2. When the run-in timer expires, the release timer will start accompanied by a buzzer tone in a different pitch.  At this point begin at 45 degree climb.  Climb angle should be obtained in 3 seconds.
  3. When the release timer expires, the bomb will automatically drop. 
  4. Roll inverted, and dive to the programmed bomb burst altitude and accelerate at maximum thrust.
  5. When the bomb hits the target you will be given your bombing score (displayed in orange text on the left side of the screen).

9.7.2.3  Level Low-Altitude Visual Attack or Mid-Altitude Blind Attack


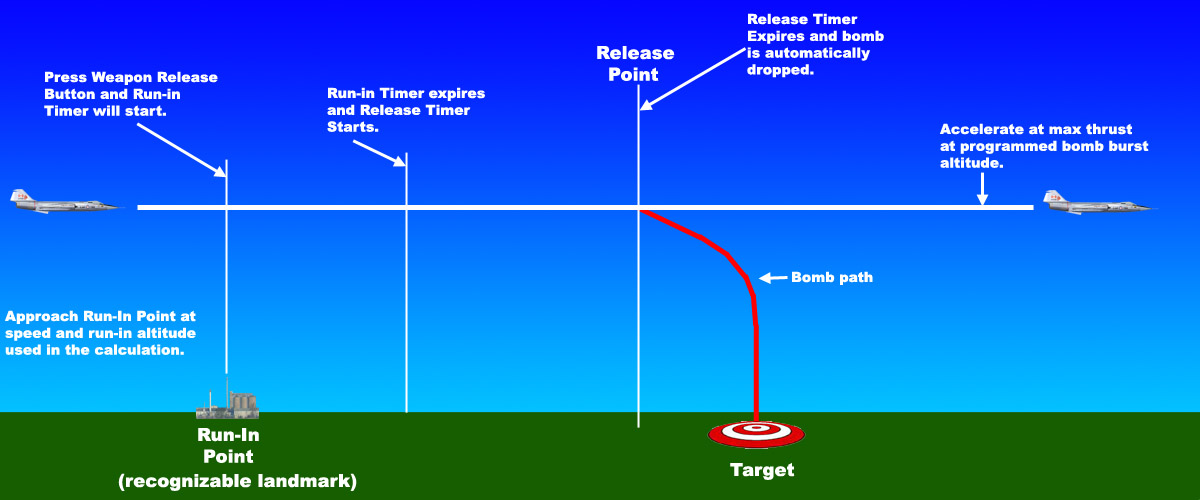
The level attacks are typically done at altitudes between 50 and 2000 feet.  For the low-level attacks where the run-in point was clearly visible, the weapon release button would be pressed as the aircraft passed above the run-in point.  For higher-altitude attacks where the run-in point was not clearly visible, the weapon release button would be pressed as the target on the radar intersects the range cursor arc.  The range cursor is set to be the distance between the run-in point and the target so when the target intersects the range cursor, the aircraft should be above the run-in point.
  1. Push bomb release button when over Run-In Point using visual identification or when the target intesects the range cursor line on the radar.  The run-in timer will start accompanied by a buzzer tone.
  2. When the run-in timer expires, the release timer will start accompanied by a buzzer tone in a different pitch. 
  3. When the release timer expires, the bomb will automatically drop. 
  4. Roll inverted, and dive to the programmed bomb burst altitude and accelerate at maximum thrust.
  5. When the bomb hits the target you will be given your bombing score (displayed in orange text on the left side of the screen).
Note that it doesn't matter in this case what value is assigned to the release timer and what value is assigned to the run-in timer, as long as the total is equal to the time value calculated by the bomb calculator.  The start of the Release Timer would normally signal to the pilot to begin a 45 degree climb in the pop-up attack but with a level attack, the altitude and speeds remain constant.

9.7.2.4  Bomb Calculator and Mission Planning


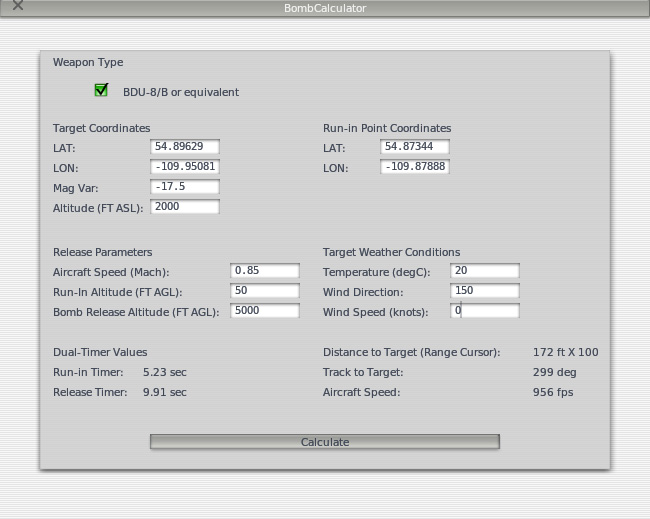
The Bomb Calculator can be opened from the Plugins-CF-104 Systems-Bomb Calculator window.  This is used to calculate the dual timer values for both pop-up and level attacks.  

Target Coordinates
Enter the latitude and longitude of the target in decimal degrees.  The X-Plane map will show you coordinates in hours, minutes, and seconds so those values must be converted to decimal.  The target altitude is entered as feet above sea level.  The magnetic variation can be read from aviation maps or can be displayed in X-Plane.  Go to Settings - Data Input & Output window in X-Plane and select pitch, roll, and headings to display to the screen.  Magnetic Variation is one of the parameters displayed for your current location.

Run-In Point Coordinates
Enter the latitude and longitude of the run-in point.  The run-in point that you select should be an easily-identifiable landmark if you are planning a visual attack.  Something like a building, bridge, intersection, edge of a lake, etc. will make a good run-in point.

Release Parameters
The approach speed to the target is entered as a Mach Number.  The ground speed will vary based on altitude and temperature so ensure you have the weather conditions entered correctly.  

For a pop-up attack, the run-in altitude is normally 50 feet.  This is the altitude above ground at which you approach the target.  The bomb release altitude should be at least 1000' AGL.  The calculated release timer value should time-out when you reach the release altitude.

For a level attack, the run-in and release altitudes will be the same.  

Target Weather Conditions
Enter the weather conditions at the target.

Dual-Timer Values
Enter the calculated Run-In Timer and Release Timer values onto the timers on the left side panel of the CF-104.  The Key Command menu may also be used to enter these values.

Distance to Target (Range Cursor)
This calculated value should be entered on the Radar Range Cursor panel on the right side panel.  This is the distance between the run-in point and the target.  See the Radar section in the manual for more information on that.

Track to Target
This is the calculated track to the target from the run-in point.


9.7.3  Creating a INS Route
Once you have determined your target coordinates, run-in point coordinates, and have planned your route, you can create a route for the INS to help you with navigation to the target.  This is especially important if you plan on performing blind attacks using the radar.  See section 3.10 on User-Defined Routes in the manual.


9.7.4  Sample Route
The Bomb Calculator screenshot above shows how it would work with the included Cold Lake mission scenery.  The run-in point is a small plant on the edge of a lake, and the target is a weapon range on the other side of the lake.
For the included Cold Lake scenery and bombing range and route supplied, the Release Timer should be set to 5.2 seconds and the Run-in Timer should be set to 9.9 seconds.  Fly the route as follows:
1.  Take off on runway 13L.  Set the waypoint to #1 and fly to this waypoint after takeoff and an altitude of around 5000 feet.
2.  When waypoint #1 is reached, advance to waypoint #2, the run-in waypoint.  You should be flying at around 50 feet AGL and M 0.85.
3.  Immediately overhead a small plant at waypoint #2 push the bomb release button to start the run-in timer, and advance the waypoint to waypoint #3, which is the bombing range target.
4.  As soon as the run-in timer expires (indicated by a change in pitch of the tones as the release timer starts), start a 45 degree climb.  This should be attained in 3 seconds.
5.  The bomb will release automatically when the release timer expires.  You'll be at about 5000' AGL at this point.  Roll inverted and dive at full-throttle to the programmed air burst altitude.  
6.  A bombing score will be displayed for you telling how far your bomb impacted from the center of the target.
7.  Select waypoint #4 to return to base, and then waypoint #5 to head in on the runway heading.

The F11 (configurable) key can be used to activate the bombing range camera when over the range.  The camera has a free view in which moving the mouse will control the camera's position.  Pushing F11 again will switch to aircraft tracking view.  Once the aircraft has dropped a bomb, the camera will track the bomb to the target.  Use the number pad "+" and "-" keys to zoom in and out.


9.7.5  User-Defined Weapon Ranges
You'll see a file in the "X-Plane/ClassicJetSimUtils/WeaponRanges" folder that lets you define the position of a bomb target and the position of the tracking camera for that weapons range.  The track camera is activated by pressing F11 to get into free view and F11 again to get into aircraft/bomb tracking view.  The weapon range closest to the aircraft is the active one.  See section 3.9 on User-Defined Weapon Ranges in the manual.