3 Setup
<- go back
3.1 Installation
PC
Run the installer and follow the directions. Make sure you select the main X-Plane folder as your installation folder!!!
Mac
1. After you download the CF-104 zip
file, double click on it to extract the contents out into a folder
"CF-104Installer".
2. Open the "CF-104Installer" folder in a FileFinder window. Inside that folder there will be several others.
3. Open your "X-Plane" folder inside of another FileFinder window.
4. Drag the "CF-104" folder from the "CF-104Installer" folder to
the "X-Plane/Aircraft/Fighters" folder or wherever you want the
aircraft to reside.
5. Drag the "ClassicJetSimUtils" folder from the "CF-104Installer" folder to the "X-Plane" folder.
6. Drag the "ColdLake" and "CYOD2" folders from the
"CF-104Installer/Custom Scenery" folder to the "X-Plane/Custom Scenery"
folder.
7. Drag the file "tacan.dat" from the "CF-104Installer/tacanData" folder to the "X-Plane/Resources/default data" folder.
8. Drag the file "cf-104_route_1.fms" from the
"CF-104Installer/FMS Plans" folder to the "X-Plane/Output/FMS plans"
folder.
9. ENSURE that your folder structure matches that as described below in section 3.6.
3.2 Field of View
To see most of the cockpit a field of view of around
87 degrees is recommended. This is set in the rendering options
menu. Of course you can adjust this to suit your preferences.
3.3 Key Command Menu
The default key to
activate the key command menu is F12 on the PC and F6 on the Mac.
This can be changed though in the CF-104 Joystick Setup menu as
described in section 3.3.
Press F12 to activate the key command menu and press F12 again to deactivate it (F6 on Mac). Press the number key associated with the menu you want to navigate to. The backspace
key takes you to the previous menu. Nearly all custom CF-104
systems such as the radar, weapon system, autopilot, etc. can be
controlled from this menu. These are the functions controlled by
the key command menu:
1. General Equipment
Open/Close Canopy
Drag Chute Deploy/Release/Repack
Start Engine
Stop Engine Start
2. Navigation Functions
TACAN Channel Set
Waypoint Set
Desired Ground Speed Set
Route File Select
3. Radar Functions
Radar Mode
Radar Range
Memory
Antenna Tilt
Range Cursor
Range Cursor Mode
Azimuth Cursor
Azimuth Cursor Mode
Drift Adjust
4. Autopilot Functions
Autopilot Engage
Altitude Hold
Mach Hold
Steering Mode
Turn Left
Turn Right
Fly Straight
5. Weapon System Functions
DCU-9/A Mode
Ordnance Selection
Bomb Mode
Run-In Timer
Release Timer
Reticle Mode
6. Lighting
Exterior Landing and Taxi Lights
Instrument Light Level
Flood Light Level
7. Emergency Operation
Eject
Canopy Jettison
Stores Jettison
Pylon Jettison
Ram Air Turbine
Emergency Gear Extension
Generator 1 Reset
Generator 2 Reset
Arrestor Hook Extension
8. Multiplayer Aircraft Info
Aircraft Id Select
Relative Heading
Distance
Altitude
See the section on CF-104 Systems for information about the specific systems controlled by the key command menu.
3.4 Joystick Setup
Make sure you configure your joysitck controls
though the plugins - CF-104 Systems - Joystick Setup Menu.
Figure 3.1 - Joystick Setup Menu
There are some custom commands not supported by x-plane that need to be
configured from here. Also the aileron trim button must be configured
here. The normal X-Plane assignments will not work for this. You don't have to change your default joystick button assignments
in the X-Plane menu. Especially important is the nose-wheel
steering button. This needs to be pressed when the rudder pedals
are moved to turn the plane on the ground.
To set up joystick buttons, first check on the X-Plane function.
Then push the button on the stick that you want to associate with
that function.
To assign joystick axes, first move the joystick wheel or axis that you
want to assign a function. You'll see one of the sliders on the
left move back and forth. Click in the box next to the slider to
designate that axis. Then check the function on the right that
you want to associate with that axis.
To assign function keys, first check the function key that you want to
assign a function to. Next check the function that you want to
assign to that function key. Note that for the Key Command menu,
you can use the same or different function keys to open and close the
menu.
For the Throttle/Idle Cutoff function, if you have a mixture control
lever with your control hardware, you can designate that lever instead
to toggle the throttle between idle and cutoff in the Preferences
Window (see next section). If you do that, don't assign a
function key here for throttle idle/cutoff.
3.5 Setting Preferences
Make sure you set your Preferences
though the plugins - CF-104 Systems - Preferences Menu.
 Figure 3.2 - Preferences Window
Plugin Controls Lateral Head Movement
If this option is checked, the cockpit view is locked to the
middle of the cockpit laterally. If you turn to look back, the
view will shift so that you look around the seat in either direction.
If you don't have trackIR and mainly use the mouse to look around
the virtual cockpit, you may like this mode of operation.
Save Fuel Levels Between Flights
Selecting this option will save fuel levels between flights.
When you re-start X-Plane, your fuel level will be the same as
when you last exited.
Symmetric BLC
Boundary Layer Control (BLC) Flaps are designed to provided more lift
over the wings during landing to keep landing speeds reasonable.
Engine air is ducted over the flaps when they are in landing
configuration to prevent airflow separation over the flaps, thereby
increasing lift. Engine RPMs must be over 83% for BLC to be
effective. Below this value, you will lose lift. In some
Starfighters, you'd lose lift over the flaps at roughly the same time.
This is symmetric BLC. More often than not, you'd lift over
the one flap before the other. This would cause the plane to roll
if you reduced engine power below 83% rpm. If you were slow
enough, one wing would stall and you would find yourself in a very fast
uncommanded roll. Leave this box unchecked if you want to have
some fun. This is why engine RPMs must be kept above 83% during
landing until the aircraft is on the ground.
Play Outdoor Sounds when Engine is Off
If you want to hear the odd Starfighter fly over or hear the glorious
sounds of nature and chirping birdies, check this box. With the
engine off and the canopy open, you will hear nature at its finest.
If anyone actually likes this, I may offer a choice between
nature sounds or more industrial sounds. If you don't like my
sounds, you can substitute your own. The sounds are prefixed by
"amb" and are in the CF-104/sounds folder.
Use Mixture
Control for Throttle Idle/Cutoff.
If you have a separate mixture
lever, once the mixture lever is set more than half way, the throttle
will go from cutoff to idle. If you are using this option you can
unassign the function key for Throttle Idle/Cutoff in the Plugins-CF-104 Systems-Joystick Setup window.
Auto Refuel from Fuel Truck
If this option is on, a fuel truck will stop by your plane and refuel
you when you turn your engine off. The refuelling rate is fast
and accurate.
Stick Shaker Sound
The stick shaker always seems to be on when turning or flying at all
slow. A sound is used as an indication that the stick shaker is
active. Uncheck this option if this sound annoys you.
Engine Howl Sounds
The engine in the Starfighter has an unique howling noise at certain engine
rpms. I've tried to replicate it. I think it needs improvement. You can turn
it off if you don't care for it.
Engine Volume Slider
If you find the engine
volume too loud, you can use this slider to turn it down. Flying
in a Starfighter is however, quite loud and the sounds are recorded
from the real jet so hook up your computer to your stereo and crank up
the volume.
Aileron/Pitch Trim Sensitivity Sliders
Some people find the pitch and aileron trim too sensitive. While
realistic at the max settings, you can move the sliders down to
decrease senstitivity.
3.6 Throttle Setup
The CF-104 simulator works best with throttles that have
adjustable afterburner detents such as the Thrustmaster HOTAS Cougar.
The last 10% of throttle travel is used for the multi-stage,
variable-thrust afterburner. Your thrust level is considerably
higher at maximum afterburner thrust than at the minimum afterburner
setting.
3.7 Folder Structure
The installer will place files in the correct folders
provided that you have selected the X-Plane folder as your installation
folder. If you're having problems selecting TACANs, aircraft for
formation flying, loading the Cold Lake scenery, verify that the
installed files are in the following folders:
X-Plane ---- aircraft ---- Classic Jet Simulations ---- CF-104 Starfighter Nuclear Strike Version <---- This is where the main CF-104 is loaded but may be
|
|
placed anywhere else
|
|
|
|----- Formation ---- CF-104 Formo
<---- If the formation application is installed (not available in 1st release)
|
the plane used as your wing mate will go here. Do not fly this plane!
|
This plane can't be moved.
|
|-- ClassicJetSimUtils ---- WeaponRanges <---- The user-defined weapon range file goes here.
|
|-- Custom Scenery ---- ColdLake <---- The main Cold Lake air base scenery.
|
|
|
|-- CYOD2 <---- The 2nd hald of the Cold Lake air base scenery.
|
|-- formation <---- The formation application is installed here (not available in 1st release).
|
|-- Output ---- FMS plans <---- User-defined route files for the Inertial Navigation System (cf104_route_n.fms) where n is from 1 to 40.
|
|-- Resources ---- default data <---- The tacan.dat file is installed here and is used for TACAN navigation in the CF-104 and other future aircraft.
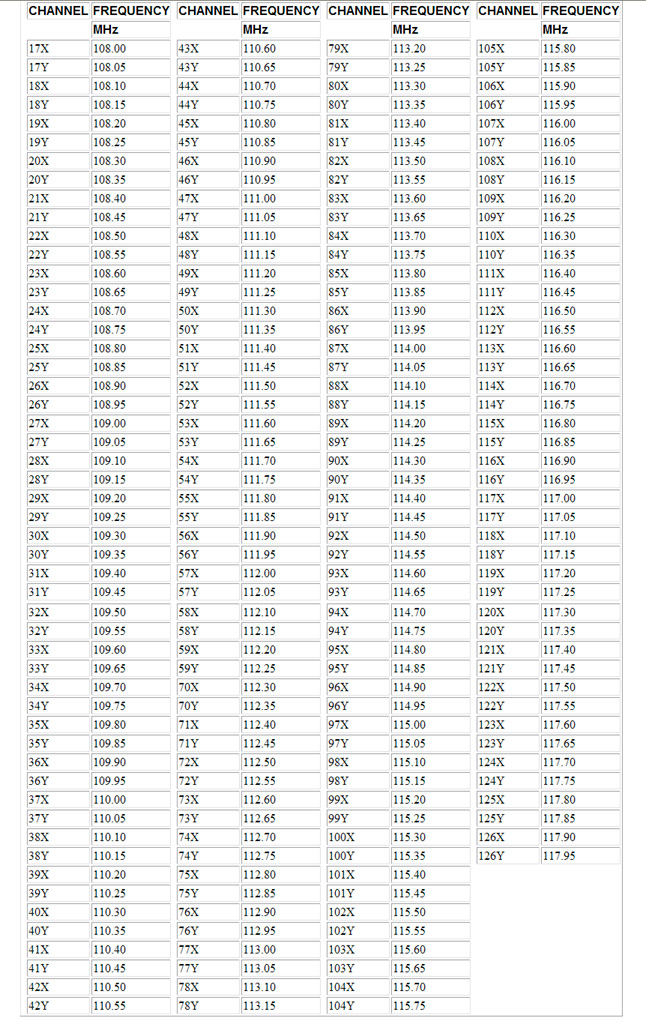
3.8 TACAN Database Information
As shown above in the folder structure, a TACAN database
is included for TACAN navigation. Many VOR stations share the
transmitter with a TACAN transmitter. These are known as VORTAC
stations. The following table relates how the TACAN channel
relates to a VOR frequency. You'll see that there are both X and
Y TACAN channels. Only the X channels were supported by the old
fighter aircraft receivers so the Y channels can be ignored.
3.9 User-Defined Weapon Ranges and Tracking Cameras
Included is a file that defines weapon ranges (see folder structure
diagram). This file specifies the center of a target and also the
position of a tracking camera. You may define as many as you like
if you develop or find scenery with bombing ranges. When a bomb
is dropped, the plugin code will check to see what bombing range is
closest. The tracking camera for that range is active as long as
you are within a few kilometers. When the bomb is dropped, a
bombing score will be provided telling how close your bomb hit from the
center of the target. No results is displayed if you are more
than 2 kilometers from the target.
The weapon range file looks as shown below:
Fields in order are:
--------------------
Camera Lat
Camera Lon
Camera Alt (ft ASL)
Target Lat
Target Lon
START
54.90075 -109.9456 2150 54.89629 -109.95081
54.40000 -110.2800 2100 54.40000 -110.2800
END
The top few lines are informational with the bomb
range definitions defined between the START and END keywords.
Camera position is first with lat/lon coordiantes and the
altitude of the camera above sea level. The last two fields
define the lat/lon coordinates of the center of the target. One
camera is positioned right above the Cold Lake air base so can be
activated when you open that scenery. The other range is defined
north of the air base and the included mission route for the INS (see
below section) will provide navigation info to the range.
3.10 User-Defined Routes for the Inertial Navigation System
Included is a file that defines a route that can be used
by the INS to take you out to the weapon range (see folder structure
diagram). The files must be called cf104_route_n.fms where n is a
number between 1 and 40. The route file must only include lat/lon
coordinates and not airport names or VOR names, etc. This is the
route file included:
I
3 version
1
0
29 CYOD 31 54.42 -110.3
29 WPT_2 0 54.74 -109.7
29 WPT_3 0 54.87344 -109.87888
29 WPT_T 0 54.89629 -109.95081
29 WPT_5 0 54.57 -110.4
0 ---- 0 0.000000 0.000000
0 ---- 0 0.000000 0.000000
.
The "29" identifies the waypoint as a lat/lon coordinate. The
second field is the waypoint name which can be anything. The 3rd
field is normally just zero and the last two fields are the lat/lon
coordinates of the waypoints. In the above file, the 4th waypoint
corresponds to the target center so you'll see that it matches the
coordinates of the bombing range defined in the weapon ranges file.
<- go back