8. EMERGENCY PROCEDURES
NOTE: Procedures highlighted in GREEN are available in X-Plane. All others have no effect in the sim or are listed for informational purposes.
Video Tutorials Included in this section (more to come):
TABLE OF CONTENTS
8.1 Engine Failure
8.2 Fire
8.3 Ejection
8.4 Take-Off and Landing Emergencies
8.5 Emergency Entrance
8.6 Ditching
8.7 External Stores Emergency Jettison
8.8 Afterburner Failure
8.9 Exhaust Nozzle Control System Failure
8.10 Oil System Failure
8.11 Fuel System Failure
8.12 Electrical System Failure
8.13 Hydraulic System Failure
8.14 Flight with RAT Extended
8.15 Trim Failure
8.16 Stability Augmentation System Failure
8.17 Auto-Pitch Control System Failure
8.18 Speed Brake System Failure
8.19 Landing Gear Emergency Operation
8.20 Loss of Emergency Pressure Relief Door
8.1 ENGINE FAILURE
Engine failure
is defined as a complete power failure which, in the pilot's judgement,
makes it impossible ro inadvisable to attempt a new start.
Examples are engine seizure, explosion, etc.
ENGINE FAILURE DURING TAKE-OFF RUN
If engine failure occurs before airplane leaves ground:
- Abort take-off.
Refer to Abort Procedure under Take-Off and Landing Emergencies in this section.
ENGINE FAILURE DURING TAKE-OFF
(AIRPLANE AIRBORNE)
Abandon the aircraft rather than land on an unprepared surface.
Note
If
a decision to eject is made, the aircraft should be allowed to climb as
far as possible. Ejection should be accomplished while the nose
of the airplance is above the horizon but but prior to reaching a stall
or sink.
ENGINE FAILURE DURING FLIGHT (NO RELIGHT)
If a complete loss of thrust occurs and an airstart is impossible or inadvisable, proceed as follows:
- Throttle - OFF.
- Ram-air turbine extension handle - PULL.
- Wing flap lever - TAKE-OFF.
- Glide speed - Reduce to 245 knots IAS.
- IFF - EMERGENCY
- Radio - Advise of emergency.
- Eject or attempt forced landing.
ENGINE AIR START
Note
The
hydraulic generator will remain operative to energize the primary fixed
frequency bus if windmill rpm is in excess of approximately 20%.
This will give the pilot fuel flow indication during an air start
attempt.
If a flameout has been experienced, an airstart may be made using the following procedure:
- Both start switches - START (hold momentarily)
Monitor engine instruments for immediate relight if engine rpm is still high.
- If immediate re-light is not obtained, throttle - positively OFF, then immediately move to MILITARY.
- Establish glide speed - 275 knots IAS.
While establishing best glide speed, the aircraft should be headed toward the nearest suitable landing field.
- If no air start occurs within 20 seconds, both start switches - START.
Do not move throttle to OFF again before this second actuation of the start switches.
- Ram-air turbine extension handle - PULL
Note
Do not extend
the RAT above 35,000 feet as chances of obtaining normal engine
operation are remote and the increased drag will reduce glide distance.
- Wing flap lever - TAKE-OFF.
- Glide speed - Reduce to 245 knots IAS.
Note
With the RAT
extended, the same glide distance may be realized at 245 knots IAS and
TAKE-OFF flaps as with 275 knots IAS and no flaps. However, the
slower speed will result in a lower rate of descent.
If time and altitude permit:
- Start switches - START.
If re-light is successful:
- Throttle - Adjust as required.
Allow engine instruments to
stabilize and adjust throttle to settings necessary for flight.
Engine instruments will give the most reliable indication of a
re-light. If re-light is unsuccessful decide whether to attempt
forced landing or eject.
Below 15,000 feet
- Throttle - Immediately to IDLE, outboard and positively OFF.
- Both start switches - START.
- RPM - 70% or below.
- Throttle - MILITARY
- Monitor rpm to 100%. Land as soon as possible. Do not decrease rpm below 97% until landing is assured.
- If rpm stops at 94%, a cold shift has occurred. Land as soon as possible, adjusting pattern for maximum rpm of 94%.
Note
- Thrust will be equal to, or greater than, that obtained at 94% under normal conditions.
- Throttle may be manipulated throughout the entire IDLE to
Military range. Afterburner operation may be initiated for
emergency use if CIT indicates +38 degC or less.
Above 15,000 feet
Note
Any
of the following procedures may clear the engine stall and all
procedures need not be accomplished in the event the stall clears.
- Throttle - MILITARY
- Throttle - IDLE; check for abnormal EGT and rpm for possible hangup
- Throttle - OFF.
- Engine airstart procedure.
- If stall still exists at 15,000 feet, use the procedure for clearing stall below 15,000 feet.
MAXIMUM GLIDE
Windmilling or Frozen Engine
Figure 8-1 shows the glide
distance obtainable with a windmilling or frozen engine. The
recommended configuration is with take-off flaps and 245 knots IAS.
The same distance can be obtained by gliding with flaps up at 275
knots; however, the rate of descent with take-off flaps is
approximately 1000 fet per minute less due to the lower speed for the
same glide ration. In addition , no change in configuration or
speed is required when the flame-out landing pattern is entered.
The data shown in the chart are for RAT extended since this
configuration represents the highest drag and is necessary for flap
extension under any engine inopertive condition and for hydraulic power
under a frozen-engine condition. Gliding without the RAT extended
would increase these distances approximately 2 nautical miles per
10,000 feet fo altitude.
Note
Unless
the engine is damaged, the windmilling engine speed will produce
sufficient hydraulic pressure to operate the flight control system.
EJECTION VS. FORCED LANDING
Because of the many variables
encountered, the final decsision to attempt a flame-out landing or to
eject must remain with the pilot. These variables make a quick
and accurate decision difficult. Furthermore, it is impossible to
establish a predetermined set of rules and instructions which would
provide a ready made decision applicable to all emergencies or this
nature because unique circumstances will be associated with each
emergency. However, certain basic conditions as listed below,
must exist before attempting a flame-out landing. Otherwise,
ejection is the best course of action.
- Flame-out landings should only be attempted by pilots who have
satisfactorily completed simulated flame-out approaches in this
aircraft.
- Flame-out landings should only be attempted on prepared or
designated suitable surfaces that provide at least twice the landing
distance normally required.
- Approaches to the landing field must be unrestricted (clear areas
of approximately 3000 to 5000 feet in length). No attempt should
be made to force-land in a heavily populated area.
- Weather and terrain conditions must be favorale. Night landings should never be attempted.
- Flame-out landings should only be attempted when either a satifactory High Key or Low Key position can be achieved.
- If at any time during the flame-out approach conditions do not
appear ideal for successful completion of the landing, eject.
Eject no lower that the Low Key altitude.
All of the above basic conditions,
combined with the pilot's analysis of the condition of the aircraft,
type of emergency, and his proficiency, are of a prime importance in
determining whether to attempt a flame-out landing or to eject.
Note
If
a decision to eject is made, the pilot should first attempt to turn the
aircraft toward an area where injury or damage to persons or property
on the ground or ware is least likely to occur.
FORCED LANDING
The recommended procedures for
making a forced landing are set forth in Figure 8-2. The 360
degree overhead pattern offers the most accurate control of the
touch-down point and should be utilized when possible. However,
since it may not be possible to enter the pattern at the High Key point
in all cases, conditions should be practiced with pattern entry at any
point up to the Low Key point to develop technique and proficiency for
these cases as well as the ideal situation.
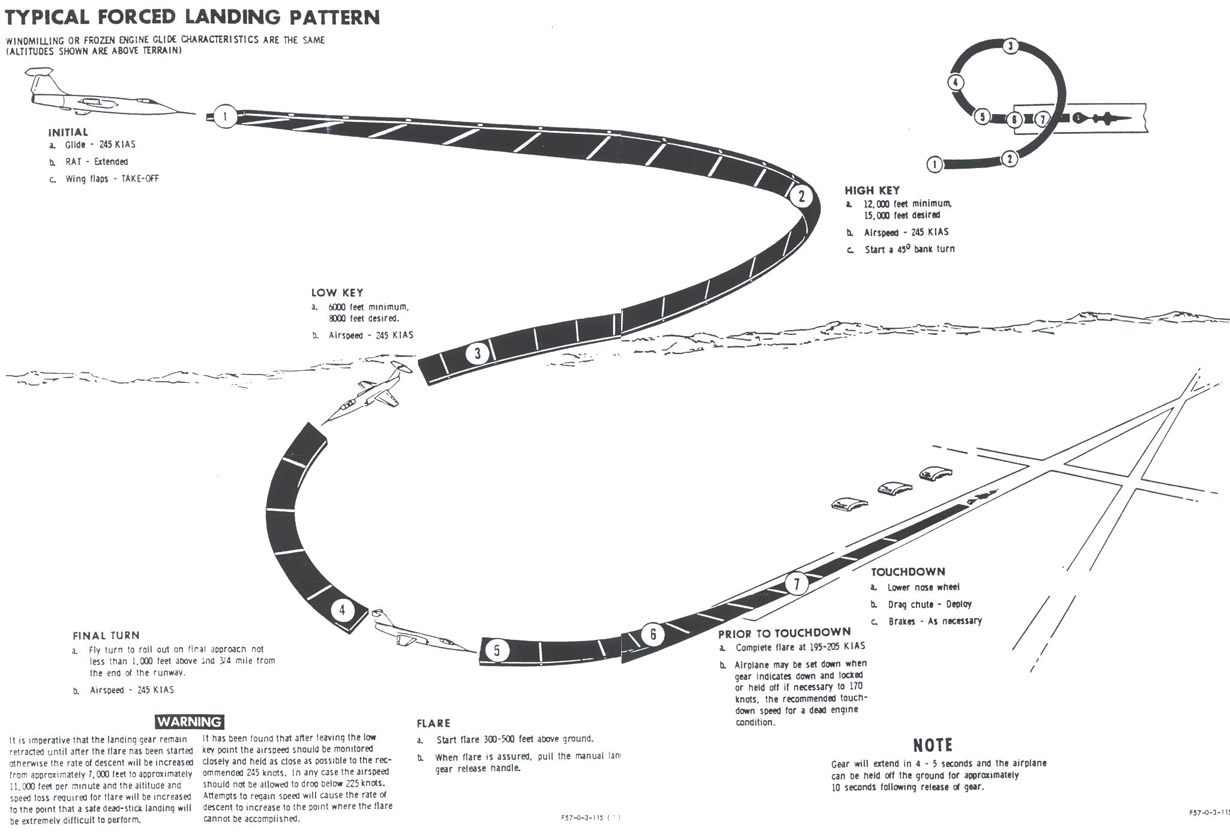
Figure 8-2
SIMULATED FORCED LANDING AND PRECAUTIONARY PATTERN
Simulated forced landings and/or precautionary landing patterns may be accomplised by using the following configuration.
|
Simulated |
Precautionary |
| 1. Throttle |
83% rpm |
83% rpm |
| 2. Speed brakes |
IN |
OUT |
| 3. Landing gear |
DOWN |
UP |
| 4. Flaps |
TAKE-OFF |
TAKE-OFF |
| 5. Ram-air turbine |
IN |
As required |
| 6. Indicated airspeed |
245 Knots |
245 Knots |
These configurations produce the approximate drag that occurs duringa
dead engine descent with take-off flaps and RAT extended and gear
retracted. It is recommended that practice glides and flame-out
patterns be made using only the simulated configuration so that the
additional safety of having the landing gear extended during the flare
can be realized. Simulation of the drag produced by landing gear
extension during the flare may be made by opening the speed brakes.
The precautionary pattern should be used only during an actual
emergency wherein loss of thrust is possible. If it is desired to
simulate a glide to the flameout pattern with flaps up, gear up, and
RAT retracted; glide at 275 knots IAS and 87% rpm with the speed brakes
fully extended.
8.2 FIRE
ENGINE FIRE DURING START
Illumination of the fire warning
lights or other evidence of fire during engine starting is an
indication of a broken or disconnected fuel lin. If this
condition occurs proceed as follows:
- Throttle - OFF.
- Start switches - STOP START.
- Fuel shut-off switch - OFF.
- Abandon aircraft as quickly as possible.
- If conditions permit, have ground electrical power source disconnected.
ENGINE FIRE DURING TAKE-OFF
Not yet modeled in sim.
ENGINE FIRE DURING FLIGHT
Fire Confirmed During Flight
- Eject
Fire Warning Light Illuminates During Flight
- Throttle - IDLE.
- If the fire warning light remains illuminated at IDLE, throttle - OFF.
- Head toward nearest suitable aerodrome - 275 knots IAS.
- If light remains ON - Eject.
- Light out, throttle on or off - Check for fire as follows:
- Warning light - TEST
- Light does not illuminate - Eject.
- Light illuminates and no signs of fire exist, make decision to
eject or land as soon as possible. Fire may be confirmed be a
report from the ground, other aircraft, engine instruments, smoke in
the cockpit or visible smoke trail behind the aircraft.
ENGINE FIRE AFTER SHUTDOWN
Not yet modeled in sim.
ELECTRICAL FIRE
Not yet modeled in sim.
ELIMINATION OF SMOKE OR FUMES
Not yet modeled in sim.
8.3 EJECTION
EJECTION ATTITUDES
Whenever possible, ejection should
be accomplished with the aircraft in a climb attitude. This will
provide the most time under any circumstances for seat separation and
parachute deployment.
EJECTION ALTITUDES
While the ejection system will
permit successful ejections at zero altitudes above 120 knots IAS, it
is advantageous when flying at very low altitudes and if circumstances
permit to zoom the aircraft and exchange excess airspeed for altitude,
before ejecting.
EJECTION SPEED
Eject at the lowest practical airspeed above 120 knots IAS. Below
120 knots IAS, airflow is not sufficient to assure rapid parachute
deployment. Therefore, it becomes extremely important during low
altitude ejection to obtain at least 120 knots IAS, if possible, to
assure complete parachute deployment at the greatest height above the
terrain. During high altitude ejection, observing this minimum
airspeed (120 knots IAS) becomes less important since there is adequate
time for chute deployment. If the aircraft is controllable,
aircraft speed should be reduced to as low as practical. Wind
blast will exert minor forces on the body up to 400 knots; appreciable
forces from 400 to 550 knots; and excessive forces above 550 knots.
8.4 TAKE-OFF AND LANDING EMERGENCIES
All landing emergencies involving landing on prepared or unprepared
surfaces should be made with the landing gear extended. The
extended gear, even on reasonably rough terrain provides an absorption
of the initial shock resulting in less injury to the pilot and damage
to the aircraft.
Note
These instructions also apply in those cases in which the runway is overshot or undershot and touchdown cannot be avoided.
WARNING
Whenever there is a possibility of
structural distortion which could cause the canopy to be jammed in the
closed position, the canopy should be jettisoned.
ABORT PROCEDURE
Arrestor Hook Operation
Note
Nosewheel steering and power brakes become inoperative when throttle is retarded to OFF.
- Throttle - IDLE , or OFF (as necessary).
- Nosewheel steering - Engage.
- Drag chute - Deploy.
- Braking - Maximum.
- Hook - Release. (Note Clear Failures option from CF-104 Flight Preparation menu must be used to raise the hook back, It could not be raised from inside the cockpit.
- External fuel tanks - Jettison. (Retain tanks if empty.)
- Aim for center of barrier.
- Harness - Locked.
- Canopy jettison handle - As desired.
Runway Overrun Barrier
- Throttle - IDLE , or OFF (as necessary).
- Nosewheel steering - Engage.
- Drag chute - Deploy.
- Braking - Maximum.
- External fuel tanks - Jettison. (Retain tanks if empty.)
- Aim for center of barrier.
- Harness - Locked.
- Canopy jettison handle - As desired.
MAIN GEAR TIRE FAILURE ON TAKE-OFF
The following procedure is recommended when a main gear tire fails
during the take-off run. This recommended technique applies
to all gross weights and airplane configurations. Directional
control of the airplane is naturally more difficult at the higher gross
weights.
- If the speed is less than 150 knots IAS, abort take-off. Refer to abort procedure above.
- If speed is greated than 150 knots, but below nose wheel lift-off speed, jettison external stores and continue take-off.
- If nose wheel lift-off speed has been attained, external stores should be retained and take-off continued.
WARNING
If take-off is continued, the landing
gear should not be retracted if the tire has failed or is suspected to
have failed, until the tire has been visually checked for fire by a
report from another plane or the tower. After the tire is checked
and if the gear is to be retracted, the wheel brakes should be applied
with the anti-skid switch OFF to stop wheel rotation before retraction
to prevent tire fragments from damaging equipment in the wheel well.
Landing should be made in accordance with the instructions in
Main Gear Flat Tire Landing in this section.
NOSE GEAR TIRE FAILURE ON TAKE-OFF
- If speed and runway permit - Abort. Refer to abort procedure above.
- If committed to take-off, continue climb at maximum afterburner.
- Remain in full afterburner and climb to safe altitude for a precautionary pattern.
Note
Engine may sustain damage from foreign objects.
- Land as soon as possible using precautionary pattern.
BELLY LANDING
Successful belly landings have been made on prepared surfaces.
Abandon the aircraft rather than attempt a belly landing on an
unprepared surface. If a gear-up landing is unavoidable proceed
as follows:
- External stores - Jettison.
Jettison external stores in appropriate area: retain tip and pylon tanks if they are empty.
- Rudder limit control circuit breaker - Pull.
- Make normal pattern.
Make normal pattern with landing gear lever UP and landing flaps extended.
- Make flat approach.
- Throttle - OFF at touchdown.
- Drag chute - Deploy.
- Fuel shut-off switch - OFF.
NOSE GEAR FLAT TIRE LANDING
If landing with a flat nose gear tire, proceed as follows:
- Nose gear - Hold off.
Hold the nose wheel off as long as practical, the lower gently to runway.
- Drag chute - Deploy after nose wheel contacts runway.
Do
not deploy the drag chute until nose wheel is on the ground because of
the nose down pitching moment which occurs when the drag chute inflates.
MAIN GEAR FLAT TIRE LANDING
- Touch down on good tire,
Touch down on the side of the runway away from the flat tire.
- Nose wheel - Lower.
- Nose wheel steering - Engage.
- Drag chute - Deploy.
ASYMMETRIC TIP TANK FUEL LOAD LANDING
Adequate control is available for landing with one tip tank full and
one tank empty under smooth air conditions; however, consideration
should be given to the added aileron requirements under strong or gusty
cross-wind conditions before attempting a landing with an asymmetric
fuel load. A crosswind from the side with the light tank
increases the aileron requirements in the same direction as used to
balance the heavy tank. It is recommended that low speed control
be evaluated prior to entering the landing pattern. If the
lateral control appears marginal for the existing landing condition,
the tanks should be jettisoned.
PARTIAL GEAR LANDING
Landing With Nose Gear Retracted
- Make normal landing.
- Lower nose at minimum of 110 knots.
Note
If necessary, light braking action may be used with nose held off.
- Throttle - OFF.
- Fuel shut-off switch - OFF.
- Drag chute - Deploy after nose contacts runway,
- Apply brakes, using differential braking to maintain directional control.
Landing with One Main Gear Up or Unlocked
If one main gear remains up or in an intermediate position, after all
procedures to extend have failed, elect to eject or land. (Refer
to Landing Gear Emergency Extension paragraph in this section for gear
extension procedures.) It is recommended that a decision to land
be based on the availability of a long, wide runway with an adjoining
unobstructed runout area; the condition of surface and area adjacent to
runway, the weather conditions, etc. To land, proceed as follows:
- External stores - Jettison (if required).
Retain empty tip and pylon tanks to absorb initial shock.
Note
If time and conditions permit, fire all ammunition and burn excess fuel to lighten airplane and to minimize fire hazard.
- Harness - Locked.
Ensure seat belt and harness are tight.
- Canopy - Jettison.
Note
- The canopy should be jettisoned prior to landing if it has been
determined by ground or air check that a gear is up or in an
intermediate position.
- Before jettisoning the canopy, place helmet visor in the down position.
- Make normal approach and landing.
Touch down on the side of the runway
away from the failed gear, bring throttle to IDLE, engage nose wheel
steering after nosewheel is on the ground, and deploy drag chute.
CAUTION
Do not deploy drag chute in excess of 200 knots IAS or at engine speeds above IDLE rpm.
- Hold faulty gear off as long as possible.
- Brakes - As required.
Use nosewheel steering and brakes to control direction of aircraft.
CAUTION
Anti-skide brakes will not be available
after the manual landing gear release handle has been used.
Required brake pedal pressure will be greater than normal to
effect braking.
- Throttle - OFF, after nosewheel steering system is no longer effective.
- Fuel shut-off switch - OFF.
BOUNDARY LAYER CONTROL SYSTEM MALFUNCTION
If a boundary layer control system malfunction is experienced, as
manifested by a strong rolling moment as the wings flaps travel to the
LAND position, proceed as follows:
- Immediately return the wing flap lever to TAKE-OFF.
- Throttle - Adjust to minimum safe setting to reduce the effect of asymmetric BLC.
- Fly final approach at not less than 195 knots IAS with takeoff flaps.
- Touchdown at 165 knots IAS.
NO-FLAP LANDING
Because of the high approach and touchdown speeds required to
accomplish a no-flap landing, it is recommended that the following
instructions be observed.
Note
All of the following speeds are based
on a landing gross weight of approximately 15,000 lbs. which includes
1000 lbs. fuel remaining. Increase approach and touchdown speeds
5 knots for each additional 1000 lbs. of airplane weight.
Trailing Edge Flap Failure
If the trailing edge flaps fail to extend (regardless of the position
of the position of the leading edge flaps) the following procedure is
recommended
- Wing flap lever - UP.
- Recommended runway length - 10,000 feet.
Note
A runway length of 10,000 feet is recommended as an added safety precaution in event of brake or drag chute failure.
- Base leg speed - 40 knots above normal.
- Final approach speed - 230 knots IAS minimum.
- Make flat approach.
A flat approach will decrease required rotation for flare.
Note
Airframe buffeting will be experienced as speed is reduced and/or G-load is increased.
- Touchdown speed - 195 knots IAS minimum.
- Lower nose, retard throttle to IDLE, and deploy drag chute immediately.
Leading Edge Flap Failure Only
- If only the leading edge flaps fail and the trailing edge flaps
can be lowered to the LAND position thereby making boundary layer
control available, normal pattern and touchdown speeds can be used.
- If trailing edge flaps can be extended only to the take-off
position, fly final approach at not less than 195 knots IAS and
touchdown at not less than 165 knots IAS.
8.5 DITCHING
Ditch only as a last resort as the nose section of the fuselage may
break off. Also the airplane will probably sink quite rapidly.
All emergency survival equipment is carried by the pilot,
consequently, there is not advantage to riding the plane down.
8.6 EXTERNAL STORES JETTISON
To jettison the external stores during an emergency, use the following procedure:
- External store jettison button - Depress. (This button is directly above the two engine start switches)
Depressing the external stores jettison button jettisons pylon and tip stores and tanks.
Note
8.7 AFTERBURNER FAILURE
8.7.1 LOSS OF AFTERBURNER DURING TAKEOFF
If the Afterburner fails during take-off:
- Abort if speed and runway permit.
Refer to Abort Procedures in this section.
If committed to take-off, proceed as follows:
- Throttle - MILITARY.
- Continue take-off at Military Thrust.
WARNING
- Afterburner failure during take-off roll, when past refusal point
and committed to take-off, becomes particularly critical under
conditions of heavy gross weight or high runway temperatures, or a
combination of these conditions. Under extreme circumstances,
aircraft may not become airborne with Military thrust unless gross
weight is reduced. If the pilot is faced with this emergency
situation, and has any doubt whatsoever regarding capability to become
safely airborne at Military thrust, he should immediately jettison
external stores.
- If afterburner thust becomes necessary, do not advance the
throttle beyond the minimum afterburner position until a positive light
is obtained. Thrust available above minimum afterburner throttle
position it less than MILITARY if afterburner light does not occur.
8.7.2 AFTERBURNER SURGE
Afterburner surge can easily be detected by a feel of instability and
EGT gauge and nozzle position indicator oscillation. If
afterburner surging occurs, proceed as follows:
- Throttle - MILITARY.
Move the the throttle out of the
afterburner range as soon as possible, preferably before more than 2
cycles of surge. This action is necessary to prevent compressor
stall and possible engine flame-out.
- Throttle - Afterburner range.
Note
Afterburner surge normally occurs
around the switchover point; an attempt should be made to select
afterburner operation below or above this point.
- If afterburner surging continues, throttle - MILITARY.
Avoid using afterburner.
8.8 EXHAUST NOZZLE CONTROL SYSTEM FAILURE
The following procedures are recommended in event of exhaust nozzle
control system failure. (Read in conjunction with Engine Oil
Level Low Warning Light procedures in this section.
Note
Under
any of the following conditions, subsequent landing should be made with
flaps at TAKE-OFF position. Also, landing gear should not be
extended until on final approach and landing is assured.
8.8.1 NOZZLE FAILS TO WIDE OPEN POSITION
Non-Afterburning:
- Most critical failure because of significant thrust decrease. Also reduction in EGT will be observed.
- Sufficient thrust is not available to maintain level flight with any configuration or airspeed at take-off gross weights.
- At normal gross weight, level flight cannot be maintained at any
speed if gear or land flaps are extended or external stores are carried.
- Level flight can be maintained up to 3500 feet in the clean
configuration at 300 knots IAS with normal landing gross weight, for
standard day or cooler temperatures.
- At higher than standard day temperatures, it is highly improbably
that level flight can be maintained at normal landing gross weight in
either the clean configuration or with TAKE-OFF flaps extended.
Afterburning:
- Indicated by a slight reduction in thrust and EGT, and in increase in nozzle area.
- Failure will probably not be detected by the pilot.
- Afterburner will continue to operate provided throttle is not retarded to sector range.
- As long as afterburning is maintained, immediate corrective action is not required.
WARNING
If afterburning is being used, maintain afterburning operation until a
safe position is established to accomplish the emergency procedures.
If Nozzle Fails to Open Position During Take-Off (Take-Off Not Committed)
- Abort.
Afterburner Take-Off, Take-Off Committed
- Maintain full afterburner and attain safe altitude.
- Carry out Nozzle Fails Open During Flight procedure.
If Nozzle Fails to Open Position During Military Thrust Take-Off.
- Exhaust nozzle control switch - Manual.
- External stores - Jettison.
- Zoom.
- Check for nozzle closure and monitor EGT.
- Land as soon as possible from a precautionary approach.
If Nozzle Fails to Open Position During Flight
WARNING
Prior to afterburner shutdown,
determine if nozzle control is available by retarding throttle slowly
in afterburner range and check if nozzle is closing. If nozzle is
not closing, momentarily place exhaust nozzle control switch to MANUAL
and return to AUTO. Proper functioning of the control system will
be indicated by sharp rise in EGT. Extreme caution must be used
when actuating the switch because a severe overtemperature condition
will result if nozzle is allowed to close fully while in afterburning.
If switch controls nozzle position, procede with the following
procedures. If switch does not control nozzle position, establish
position from which a safe landing may be made with open nozzle.
- Throttle - MILITARY.
- Exhaust nozzle control switch - Manual.
- Check for nozzle closure and monitor EGT.
- Establish precautionary landing pattern to ensure safe landing in case nozzle re-opens.
- If failure occurs during landing pattern, reduce drag by doing the following:
- Speed brakes - In.
- Landing gear - Up.
- Flaps - TAKE-OFF.
- External stores - Jettison.
If Nozzle Fails to the Mechanical Schedule Position
- Afterburner - OFF.
- EGT - monitor.
- Exhaust nozzle control switch - MANUAL.
If Severe Nozzle Fluctuations Occur
- Establish safe altitude.
- Throttle - Retard to just below temperature modulating range - (approximately 570 deg C).
- If nozzle does not stabilize - Switch to MANUAL.
- EGT - monitor.
If Exhaust Nozzle Fails to Close When Exhaust Nozzle Control Switch is in Manual Position
- Throttle - Advance rapidly to maximum thrust.
- If afterburner light is obtained, exhaust nozzle control switch - AUTO.
- Obtain desired altitude and airspeed.
- If afterburner fails to light - Carry out Nozzle Fails Open During Flight procedure.
- Land as soon as possible from a precautionary approach.
Note
An afterburner light with a wide-open
nozzle at low indicated airspeed (such as in the take-off or landing
patterns) is not certain, but possible. A 3 to 5 second delay may
occur before afterburner light is obtained. If an afterburner
light is not obtained, leaving the throttle in the afterburner range
will not adversely affect engine operation and will reduce fuel load.
8.9 OIL SYSTEM FAILURE
In general if an oil system malfunction (as evidenced by high or low
oil pressure) has caused prolonged oil starvation of engine bearings,
the results will be a progressive bearing failure and subsequent engine
seizure. The time interval from the moment of oil starvation to
complete failure depends on such factors as: condition of
bearings prior to oil starvation, operating temperatures of bearings,
and bearing loads. Bearing failure due to oil starvation is
generally characterized by a rapidly increasing vibration. When
the vibration becomes moderate to heavy, complete failure is only
seconds away and in most instances the pilot will increase his chances
for a successful ejection or power-off landing by shutting down the
engine. For oil system failure during take-off, follow Abort Procedure in this section.
Note
A decrease in oil pressure may indicate
an oil loss to the engine which will lead eventually to a complete loss
of oil to the bearings.
The engine will operate with a complete stoppage of oil to the engine
for a period of at least 1 minute at Military Thrust before engine
seizure. Limited experience has indicated the engine should
operate for a period of 4 to 5 minutes at 80% to 90% rpm before a
complete failure occurs. In view of the above, the following
operating procedures shall be observed for oil pressure changes:
- Reduce rpm to 86% - 89%.
Reduce thrust to that necessary to maintain safe altitude and level flight (86% to 89% for a clean airplane.)
WARNING
Loss of engine oil (as indicated by the
ENGINE OIL LEVEL LOW warning light) will also result in loss of exhaust
nozzle control. The resulting loss of thrust with the nozzle in
the open position may be as much as 70% at 100% rpm. Refer to
Exhaust Nozzle Control System Failure in this section.
- External stores - Jettison (if necessary).
Jettison external stores if necessary
to maintain safe altitude and level flight. Retain external tanks
if safe level flight can be maintained and fuel is needed.
- Avoid abrupt maneuvers causing high G forces.
- Avoid rapid and large throttle movements. Hold throttle changes to a minimum.
Note
High thrust setting should be avoided
if at all possible in order to keep temperature and bearing loads at a
minimum. Upon detection of an oil system malfunction (as
evidenced by the oil pressure gauge) a minimum thrust setting should be
established depending on aircraft configuration, gross weight and
altitude. This setting should be sufficient to maintain level
flight and allow for safe approach maneuvers (subsequent throttle
movements should be avoided if possible). However, if the
malfunction has gone unnoticed and has progressed to the point where
bearing failure has started, as evidenced by vibration, the throttle
should not be retarded. If the throttle is retarded, the
resistance to rotation offered by one or more failing bearings may
cause further deceleration and complete engine seizure in a very short
time.
WARNING
Increasing vibration is an indication
of a bearing failure. Extreme vibration, usually accompanied by a
rise in EGT, indicates engine seizure will occur within a few seconds.
The throttle should be cut off to prevent excessive damage to the
engine, resulting in possible damage to the aircraft structure.
- Land as soon as possible using a precautionary pattern to insure a safe landing in the event of engine failure.
- Throttle - OFF at touchdown.
Engine Oil Level Low Warning Light
Illumination of the ENGINE OIL LEVEL LOW warning light indicates that
the oil quantity is down to a reserve of approximately 0.7 Imp. gallons
and that the exhaust nozzle can be expected to fail to the open
position. If the oil loss is due to a leak in the engine
hydraulic system, sufficient reserve oil will be available to lubricate
the engine for approximately 2 hours. However, if the loss of oil
is due to a leak in the lubricating system, as indicated by a drop in
oil pressure, a rapid engine bearing failure will occur. Refer to
Oil System Failure in this section. In view of the above, proceed as follows:
- If light illuminates prior to take-off - Abort the flight.
- If light illuminates during takeoff and sufficient runway remains - Abort.
- If the light illuminate in flight, land as soon as possible using
a precautionary pattern to insure a safe landing. Depending on
the oil pressure indications, use one of the following procedures:
- If light illuminates without an oil pressure drop - Follow procedure for Exhaust Nozzle Control System Failure.
- If light illuminates with an oil pressure drop - Follow procedure for Oil System Failure.
8.10 FUEL SYSTEM FAILURE
EXTERNAL FUEL TRANSFER FAILURE
Pylon Tanks Not Feeding
- Air refuel switch - OFF.
- Pull external tank fuel transfer circuit breaker.
- Reset circuit breaker after pylon tanks are empty.
- If malfunction is not corrected - Jettison pylons using selective jettison system.
Tip Tanks Not Feeding
- Air refuel switch - OFF.
- Pull external tank fuel transfer circuit breaker.
- Reset circuit breaker after tanks are empty.
8.11 ELECTRICAL SYSTEM FAILURES
See Electrical System section in manual for more information on the Electrical System.
GENERATOR FAILURE
If generator failure occurs, accomplish the following as applicable:
NO. 1 or NO. 2 GENERATOR OUT
If No.1 or No.2 generator-out warning light illuminates:
- Move corresponding generator switch to ON-RESET and release when light is out ( 2 - 3 seconds).
This will restore generator to service if failure was caused by momentary overvoltage.
NO.1 and NO. 2 GENERATOR OUT
If both No. 1 and No. 2 generators
fail as evidenced by failure of all electrical equipment except that
powered by the primary fixed frequency bus and the batteries, proceed
as follows:
- No. 1 generator switch - ON-RESET position until light is out (2 - 3 seconds).
- No. 2 generator switch - ON-RESET position until light is out (2 - 3 seconds).
- If generator operation is not restored and electrical power is required - Extend RAT.
Refer to Flight with RAT Extended in this section.
- Land as soon as possible.
Note
If both No. 1 and No. 2 generators and
the RAT-driven generator become inoperable, the batteries will last
approximately 30 minutes, therefore, a landing should be made as soon
as possible.
HYDRAULIC GENERATOR FAILURE
If the INST ON EMER POWER warning
light illuminates, the hydraulic generator has failed. A relay
then closes which connects variable-frequency power from the emergency
ac bus to both fixed-frequency ac busses.
Fixed-frequency-power flight
instruments operate adequately on variable-frequency, however, the
radar system will be inoperative without primary dc power.
PRIMARY DC BUS FAILURE
If the primary dc bus fails as indicated by illumination of the primary
dc bus out warning light, a landing should be made as soon as possible.
Refer to Electrical System diagram for those systems rendered inoperable when the primary dc bus fails.
8.12 HYDRAULIC SYSTEM FAILURE
NO. 1 SYSTEM OUT
If the No. 1 hydraulic system fails as indicated by the HYD SYSTEM OUT and AUTO-PITCH OUT wanring lights, proceed as follows:
- Monitor No.2 pressure for remainder of flight.
- Land as soon as possible. Failure of the No. 1 hydraulic system will causes the yaw damper to become inoperative.
NO. 2 SYSTEM OUT
WARNING
Close
speed brakes if a hydraulic failure is imminent. Without No. 2
hydraulic system pressure, the speed brakes cannot be closed.
Failure ot the No. 2 system
will render the pitch and roll dampers inoperative in addition to those
items operated by the utility hydraulic system. If a No. 2 system
failure is experienced as indicated by the illumination ofr HYD. SYSTEM
OUT warning light, proceed as follows:
- Monitor No. 1 pressure for remainder of flight.
- Land as soon as possible. Extend gear with the manual landing gear release handle.
Note
Nosewheel steering and anti-skid brakes are inoperative with No. 2 system out.
CAUTION
If the No. 2 hydraulic system fails or
fluctuates do not use nose wheel steering. Use of nose wheel
steering under these conditions allows air to enter the system causing
violent shimmy action with possible substantial damage.
BOTH NO. 1 AND NO. 2 SYSTEMS OUT
WARNING
Close
speed brakes if a hydraulic failure is imminent. Without No. 2
hydraulic system pressure, the speed brakes cannot be closed.
- Ram-air turbine extension handle - Pull (above minimum recommended airspeed).
(Refer to Flight with RAT Extended in this section.)
- Monitor No. 1 hydraulic system pressure gauge.
- If presure builds up, land as soon as possible. Continue to
monitor pressure and extend landing gear with manual release handle.
Note
Maximum hydraulic flow available under
these conditions is reduced, however, it is sufficiently high for safe
flight and moderate maneuvers necessary for landing.
- If pressure fails to increase sufficiently for adequate flight control response - Eject.
8.13 FLIGHT WITH RAT EXTENDED
The ram-air turbine is available for emergency electrical and hydraulic power when the engine-driven power sources are lost. Extension
of the RAT with the engine running can under certain conditions
adversely affect engine operation. Because several inadvertent
RAT extensions have been experienced, an operating envelope with the
engine running and the RAT extended is provided below.
NOTE: In
X-Plane the only aerodynamic effect modelled so far with the RAT
extended is a strong right roll tendency at low airspeeds.
- The RAT can be extended in level flight without affecting engine operation at any speed up to 550 KIAS, except as follows:
- At 40,000 feet and above - 350 KIAS minimum.
- At 35,000 feet - 325 KIAS minimum.
- At 30,000 feet and below - No minimum limit
- Normal airstarts with the RAT extended can be made at all altitudes up to 35,000 feet.
- Maneuverability is satisfactory with the No. 1 and No. 2
hydraulic pumps inoperative with the RAT supplying hydraulic pump power
up to 500 KIAS.
- Spiral climbs and descents can be made without affecting normal engine operation or airplane maneuverability.
- Best range with the RAT extended and 3,000 lbs of fuel remaining
is realized by cruising at M 0.82 at 27,000 feet. Range will be
approximately 170 nautical miles per 1000 lbs of fuel used.
- Factors such as G's, yaw, abrupt maneuvers, or rapid throttle
movements may induce engine instability, stalls, or flame-outs with the
RAT extended, especially above 30,000 feet. Below 30,000 feet, 45
degree banks do not affect engine operation.
Deploy the ram-air turbine only for:
- Double hydraulic failure.
- Double electrical failure.
- Flame-out landing.
- Seized engine.
- Dead engine descent in weather.
Note
If a flame-out or engine stall occurs when the RAT is extended, accomplish normal air-start or stall-clearing procedures.
When flying with the RAT extended,
avoid abrupt or uncoordinated maneuvers and move throttle slowly and
only when necessary. Land as soon as practical and use thrust as
required.
Note

